The error description reads as follows:
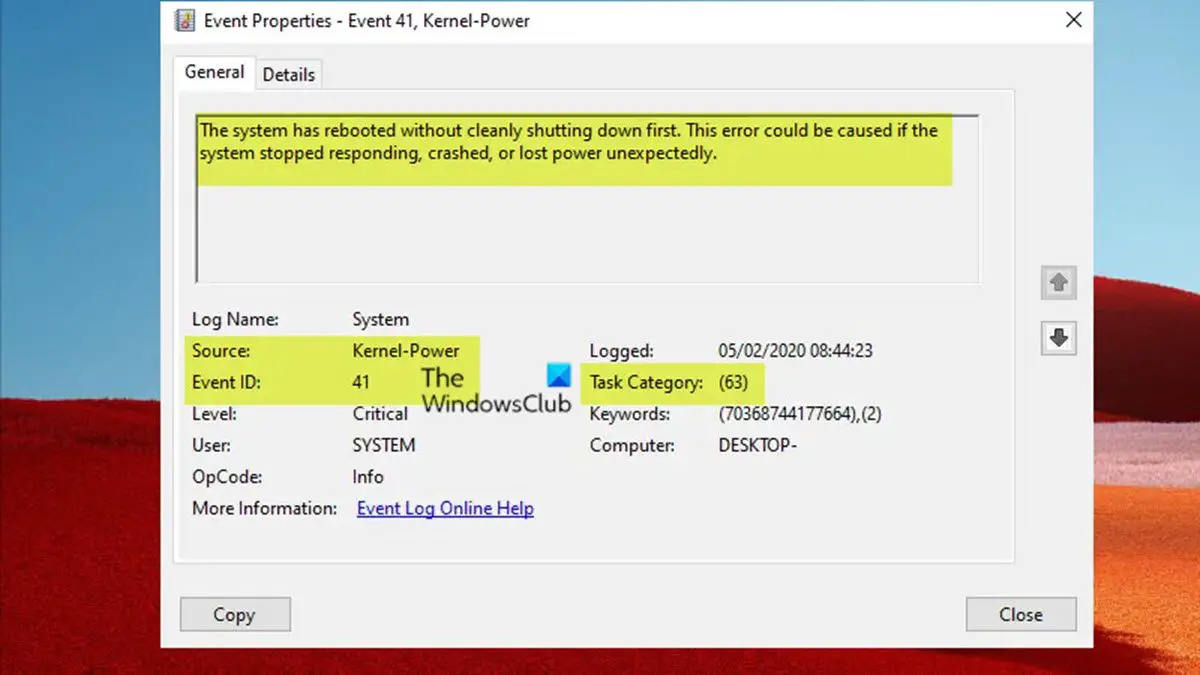
Kernel-Power Event ID 41 Task 63 error
If you see the Kernel-Power Event ID 41 Task 63 error is logged in Event Viewer after your Windows 11/10 computer freezes and you perform a hard reboot, then you can apply our recommended solutions presented below in no particular order (we suggest you start with the initial checklist) and see if that helps you resolve the issue on your system. On completion of each solution, use your computer as usual and see if the issue reoccurs before moving to the next fix. Let’s look at the description of the process as it relates to each of the listed solutions.
1] Initial checklist
The Kernel-Power Event ID 41 Task 63 in Windows 11/10 is a common shutdown error code and a critical system issue that seemingly appears for no reason that causes your system to crash. The error can trigger under a range of circumstances, though all relate to a power issue. However, this issue doesn’t always indicate a power supply issue, but rather an issue with your system hardware causing a power fault, and consequently, your system crashes. So, before you proceed with the solutions proper below, you can go through this initial checklist to cover the basics. After you tick the box for each task, continue using your PC normally and see if the issue reoccurs before you perform the next task.
Disable Fast Startup. Fast Startup feature, enabled by default, is a hybrid sleep mode that enables your computer to boot extremely quickly. The implication is, that your computer doesn’t completely shut down, but rather combines a full shutdown with hibernation mode, saving the last machine state to enable you to resume using your PC straight away. However, unlike full hibernation mode, when you return, it is like starting the machine from scratch. There are no windows open, and your previous applications are not open, and so on. Although, a neat feature, sometimes it could be the cause of certain problems. So, you can disable Fast Startup and see if that helps with this particular issue.Run CHKDSK and SFC scan. Next up, you can run CHKDSK to verify the integrity of your Windows 11/10 file system. If the procedure doesn’t find any faults, you can run the System File Checker (SFC) scan to check for missing or corrupt Windows system files. The difference between the former and the latter is the scope of the scan, where CHKDSK scans your entire drive for errors, whereas SFC scans your Windows system files specifically. However, before you run the SFC scan command, it is best to run the DISM scan so that SFC doesn’t pull corrupt system files to repair system files if needed from the WinSxS folder which is the system files source cache.
Read: How to repair Windows 11 without losing data or programs
2] Run Power Troubleshooter
Given that the error in view on your Windows 11/10 computer is power-related, your next attempt to troubleshoot the issue is to run the Power Troubleshooter. The automated wizard will detect and recommend appropriate steps you can take to fix any underlying power issues that might have triggered the event. To run the Power Troubleshooter on your Windows 11 device, do the following:
Press the Windows key + I to open the Settings app.Navigate to System > Troubleshoot > Other troubleshooters.Under the Other section, find Power.Click the Run button.Follow on-screen instructions and apply any recommended fixes.
Read: How to check the Shutdown and Startup Log in Windows To run the Power Troubleshooter on your Windows 10 PC, do the following:
Press the Windows key + I to open the Settings app.Go to Update and Security.Click the Troubleshooter tab.Scroll down and click on Power.Click the Run the troubleshooter button.Follow on-screen instructions and apply any recommended fixes.
Read: Windows PC does not Sleep; Sleep Mode not working
3] Update device drivers
Corrupted or outdated device drivers can cause system malfunctions like the present issue you are dealing with. So, to rule out this possibility as a potential culprit, you can update drivers on your PC using any of the following methods:
You can manually update drivers via Device Manager if you have already downloaded the .inf or .sys file for the driver.You can update the driver via Command Prompt.You can as well get the driver updates in the Optional Updates section under Windows Update.You may also download the latest version of the driver from the manufacturer’s website.You can automatically update your drivers using any of the free Driver Update software.
Read: How do you update Chipset drivers?
4] Change Sleep and Hard Disk power settings
The error in hand can occur on your Windows 11/10 computer due to the power settings of your hard disk most especially in this case. So, to resolve the issue, you need to adjust or change your hard disk power settings by following these steps:
Press Windows Key + S, type power, and choose Power & sleep settings from the menu.When the Power Options window opens, click on Additional power settings.Find your current plan. If Power Plans are missing, see this guide on how to restore them.Click on Change plan settings for your active power plan.On the Edit Plan Settings applet that opens, click on Change advanced power settings.In the Power Options panel that appears, scroll to the Hard disk section and click to expand.Next, click on Turn off hard disk after and set it to Never.Next. click the Sleep section to expand.Select Sleep after and also set it to Never.Click Apply > OK to save the changes.Restart PC.
Read: Change Power Plan and Create Custom Power Plans in Windows
5] Use OCCT to test for PSU issues (applies to Desktop PCs)
As reported by some affected mostly desktop PC users, this troubleshooting step identified that a faulty PSU was the culprit. You can check your PSU using a multimeter or a dedicated PSU testing tool. However, it’s known that the majority of software-based PSU checking tools cannot deliver an accurate reading on whether your PSU is working correctly. That said, if you do want to attempt a PSU software test, you can use OCCT (OverClock Checking Tool), a free CPU/GPU/PSU stress testing tool. OCCT stress tests your CPU, GPU, and motherboard, and in the process, can discover any faults with your power supply unit. To use OCCT to test for PSU issues, do the following:
Save any work and close any other open programs on your system.Open OCCT.Under Test Configuration, select Power.Set the Instruction Set to Auto.When ready, click the Play bar in OCCT to begin the stress test.
Once the test completes, OCCT will output a log highlighting any potential PSU errors so you can take any necessary actions. Read: How to check how much Power your Computer needs?
6] Check your hardware
This error can also be related to your hardware, and if you’ve encountered a random restart on your Windows 11/10 computer, it might be due to a hardware problem. Some affected PC users reported that replacing their motherboard or power supply unit resolved the issue for them. Some others also reported that their issue was caused due to RAM and GPU, but after reseating their RAM module and the graphics card the issue was resolved – in the event this didn’t resolve the issue probably because the hardware in question is faulty, you will have to replace them, but you can run the Hardware and Devices Troubleshooter to know what you are up against. You can also perform a Hardware Clean Boot to troubleshoot to identify and isolate the device that might be responsible for the issue you’re currently facing. Once you identify any problematic device, you may have to update the driver for the devices or take any other necessary action. Read: How to find the cause of an Unexpected Shutdown on Windows
7] Update BIOS (if applicable)
Before you proceed with this solution after you have exhausted all other avenues, first check for updates and install any available bits on your Windows 11/10 device. After your PC is updated or your system is already updated, continue using your PC normally, and if the issue in highlight reoccurs then you may have to update the BIOS. However, keep in mind that BIOS updates only fix hardware issues (which can be detected by running the Hardware and Devices Troubleshooter as described above) and not software issues unless that software is directly related to the hardware. You’ll need to verify the BIOS version and make sure that the BIOS update you plan on using is the next version. The easiest way to find your BIOS version is to open the System Information (msinfo32) utility and click System Summary; your BIOS version should be listed on the right pane under your processor speed – make a note of your version number (and the date that appears afterward, if applicable). With this information, depending on your PC manufacturer you can now proceed to perform a BIOS update as follows – but make sure to view the readme file on the manufacturer’s website to learn what’s being updated and if the available update does not address the hardware, you’re having problems with, you may not want to flash the BIOS.
If you own a Dell laptop you can head over to Dell.com, or you could use Dell Update Utility.ASUS users can download the MyASUS BIOS update utility from the Microsoft Store.ACER users can go here. Enter your Serial Number/SNID or search for your product by Model, select BIOS/Firmware, and click the Download link for the file you want to download.Lenovo users can use the Lenovo System Update Tool.HP users can use the bundled HP Support Assistant.
Read: Fix Firmware update failed in Windows I hope this post helps you! Now read: Computer restarted unexpectedly or encountered an unexpected error
What causes Kernel-Power error 41?
The Kernel-Power 41 error is generated by Windows 10 when the system reboots without cleanly shutting down first. It means that your system wasn’t able to go through the routine shutdown procedure and instead had something else cause a crash, loss of power, or restart.
What is a Kernel error in Windows?
Kernel Security Check Failure is not a virus in itself, it is an error message that Windows 10 displays on the screen when certain data files are corrupted. The root cause of data corruption may indeed be malware and virus infections, incompatible settings, memory issues, incorrect Registry changes, and more. Read: Kernel ntoskrnl.exe is missing or contains errors, Error code 0xc0000221
Can RAM cause Kernel-Power 41?
Faulty RAM or memory errors may also cause Kernel-Power Error 41 BSOD. Some users have reported that the issue was caused due to faulty RAM. You can run the Memory Diagnostic Tool to check problems with it. To run Windows Memory Diagnostic tool, press Windows Key+R, type mdsched.exe into the Run dialog that appears, and press Enter. You’ll need to reboot your computer to perform the test. Read: Was Windows last boot from Fast Startup, Full Shutdown, Hibernate?
What is Kernel Power Manager?
The Windows Kernel-mode power manager manages the orderly change in power status for all devices that support power state changes. This is often done through a complex stack of devices controlling other devices.