Print PowerPoint Slides, Notes, and Handouts
Open the PowerPoint presentation that you are looking to print.
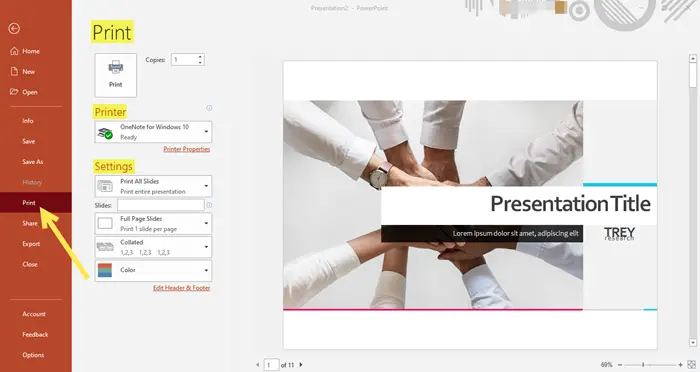
On the top left side in the Ribbon, click on the ‘File’ option.
As you can see in the image above, a Menu with different settings and commands will appear in the left pane. Click on ‘Print’. You will see Printer options, number of copies, and other settings such as the number of slides to print, the layout, color options, etc.
Printer
Under ‘Printer‘, click on the drop-down arrow and select the printer you want to print to. In case, the printer you are looking for is not available or visible in the list, you can choose the ‘Add Printer’ option to add the printer of your choice. Also, select the number of copies you want to print.
Settings
Under ‘Settings’, select the desired options you prefer from the drop-down menu. For Slides, choose to print all slides, print selection, the print current slide, or custom range, depending on how you prefer. This means you have the choice to print the entire presentation, or a few selected slides, or just the current slide.
Or, in the ‘Slides’ box, you can type the slide range or which slide numbers to print, separated by a comma.
Next, select the Print Layout you prefer. It is possible to print just the slides, or just the speaker notes, or just an outline, or handouts. If you want to print 1 slide per page, then, select ‘Full Page Slides’ to do so. To print slides with notes, choose ‘Notes Pages’. Note: The Notes Pages option shows the slides as well as the related speaker notes below it. To print a text outline only, choose the ‘Outline’ option. Note: The Outline prints only the text in the slides, without images. Under ‘Handouts’, you will see a variety of layouts to print Handouts, vertically as well as horizontally. Several numbers of slides, ranging from 1 to even 9, can be printed on a single page. Choose the desired layout wisely in case you need some space for note-taking.
Example of an ideal layout of Handouts for note-taking
In the above example, I have chosen the ‘3 Slides’ per page option in Portrait Orientation for Handouts and you can see how wonderful the layout looks, allowing the audience to take down notes in front of every slide. You can either choose Portrait Orientation or Landscape Orientation. Under ‘Collated’, choose whether you want the sheets to be collated or uncollated, that is how you want the sequence of the sheets to be. The next setting is related to the ‘Color’ preferences. From the drop-down menu, choose whether you want Color, Grayscale, or Pure Black and White.
Edit Header & Footer
At the end of the Settings, you will see a link called ‘Edit Header & Footer’. In this option, you can select whether you want to mention the date and time, slide number, and footer on the printed copies. Click ‘Apply to All’ to proceed. Once all these settings are selected, click ‘Print’. The required number of copies with chosen slides, layout, and color settings will be out and ready for your audience to use.