For PC users that are blind or have low vision, the Narrator accessibility feature in Windows, lets you use your PC without a display or mouse to complete common tasks – it reads and interacts with things on the screen, like text and buttons. The narrator can be used to read and write an email, browse the internet, and work with documents. In Windows 11/10, there are a lot of options for Narrator that you can customize. You can change its keyboard shortcuts, personalize Narrator’s voice, enable Caps Lock warnings, and more. You can choose the voice for the Narrator, adjust the speaking rate, pitch, and volume.
Change Default Audio Output Device for Narrator
Windows 11
To change the default Audio Output Device for Narrator for your account in Windows 11, do the following. Right-click the Start button on the Taskbar and choose Settings from the list of options displayed therein. Alternatively, you can use the Win+I keyboard shortcut to go to the settings window directly.
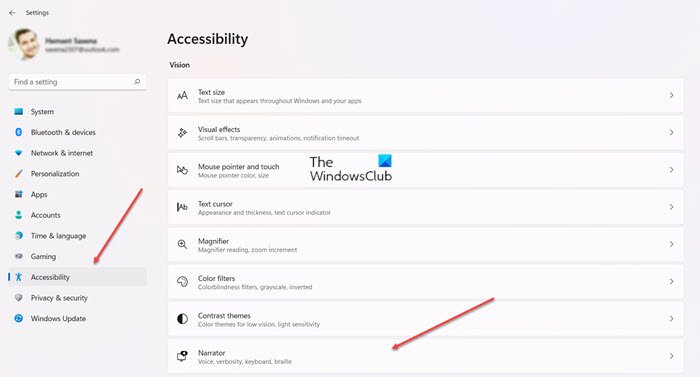
Select Accessibility from the side panel on the left and go to Narrator settings.
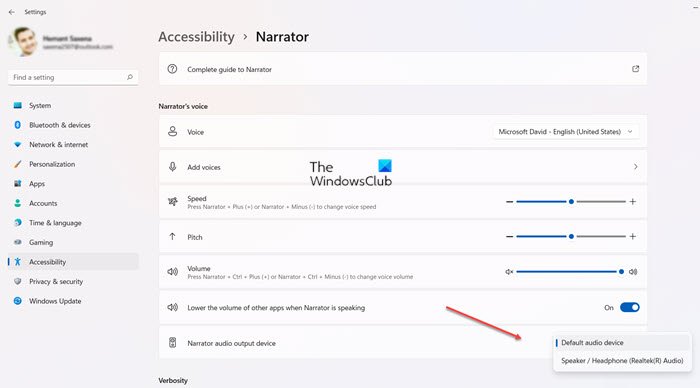
Under Narrator’s voice section, scroll down to Narrator output device, hit the drop-down menu next to the Narrator audio output device, and choose either Default audio device or Speaker/Headphone.
Windows 10
To change the default audio output device used to play the voice of the Narrator in Windows 10, do the following:
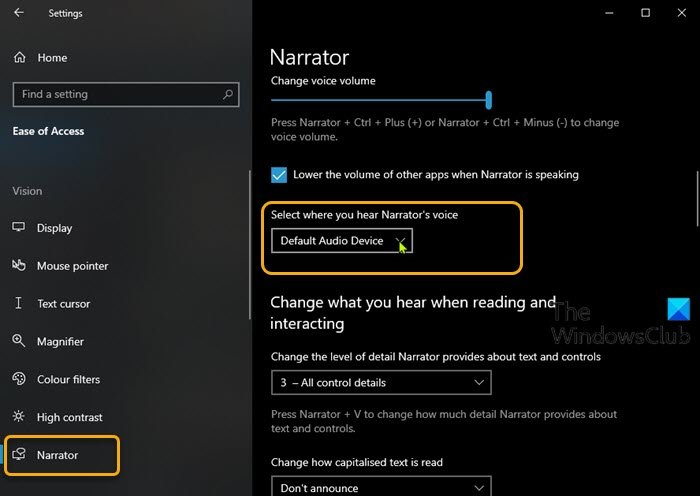
Press the Windows key + I to open Settings.From the Settings menu, click Ease of Access.Click Narrator on the left pane.In the Narrator window, on the right pane, toggle the button to On to enable Narrator if required.Still on the right pane, scroll down to the Personalize Narrator’s voice section.For the Select where you hear Narrator’s voice option, click the drop-down and select the audio output device you want from the list.
Note: You will not be able to choose if you do not have multiple audio output devices connected to your Windows 10 computer.
Exit Settings when done.
Settings get saved to Registry here in Windows 11/10
The changes you made will be saved at the Registry branch below: At the location, on the right pane, the changes will be saved under the string values DesiredAudioChannel and DisplayedAudioChannel. That’s it!
How do I use Narrator on my computer?
To start Narrator in Windows 11/10, press Win+Ctrl+Enter on your keyboard. Instantly, Narrator will begin reading aloud items on the screen such as buttons and menus, as you select them or access them using the keyboard.
What is the Narrator cursor?
It’s a pointer that lets you read and interact with items on the screen like a text button or menu without using a mouse. It’s an accessibility feature, designed for people who are visually impaired or have low vision.