Add Kill All Not Responding Tasks to the Context menu on Windows 11/10
If you want to add the Kill all not responding tasks to the desktop context menu in your Windows 11/10 computer, then some Registry tweaks are needed. Before you start tweaking the Registry, you must backup the Registry which can be helpful to restore it, just in case. Now follow these steps:
Open the Windows RegistrySelect the Shell keyCreate a KillNRTasks sub-keyCreate the following String values under the KillNRTasks sub-key:MUIverbiconPositionAdd Value data for all the String valuesCreate a command Registry keyFill Value data of Default String ValueClose the Windows Registry.
The above steps are used to create a kill option for the context menu, put that option to the desktop context menu with the bottom, up, or middle position, and execute the Taskkill command using that option for all non-responding processes. So, it is clear what these steps are used for. Now let’s check all the steps in detail. First of all, press the Win+R hotkey and that will open the Run Command box. Type regedit in that box and tap the Enter key to open the Windows Registry. Go to the Shell key using the path given below:
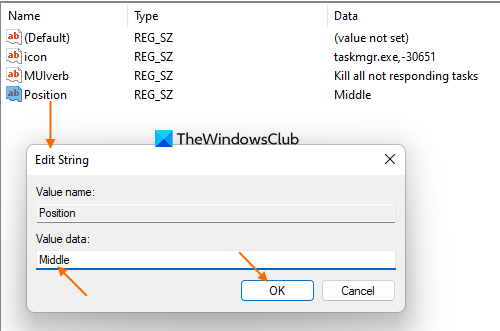
In the Shell key, create a Registry key, and name it KillNRTasks. Now right-click on the KIllNRTasks key, use the New menu, and use the String Value option. A new String value will be in front of you. Rename it to MUIverb. In the same way, create an icon String value, and a Position String value.
You don’t have to follow this order; you can create any String value first. It’s time to fill the Value data of all the added String values. Double-tap on the MUIverb value and you will see an Edit String box. In the Value data, put Kill all not responding tasks. Press the OK button.
Next, open the Edit String box of Position value and add Middle, Up, or Bottom in the Value data. Use the OK button to close the box.
This time, open the Edit String box of icon Sting value and add taskmgr.exe,-30651 in the Value data. Hit the OK button.
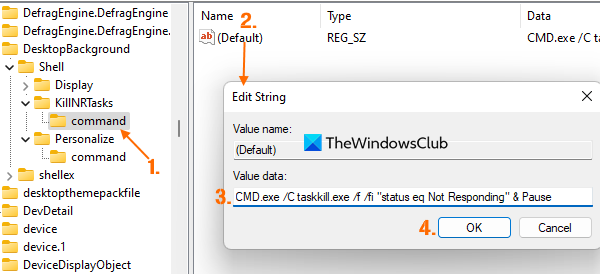
Under the KillNRTasks key, create a sub-key and rename it to command. A Default String value will be added automatically on the right-hand part of this command key. Double-click that Default String value. When the Edit String box is opened, paste the following command in the Value data.
That’s all! It will apply the changes. If not, then restart File Explorer or your computer to add the changes. Whenever some programs are stuck and become unresponsive, open the desktop context menu and use the kill option added by you. A CMD.exe window will open, trigger the command and see if there is any non-responding process(es). Once it finds that, it will kill those processes silently. Once the command is executed completely, press any key to exit the CMD.exe window. In case you want to remove this option from the desktop context menu, you can do this using the steps mentioned above. Just go to the Shell key and then delete the KillNRTasks Registry key that you created. Hope this is helpful.
How do I kill a Windows not responding process?
There are different ways to kill a not responding process in Windows 11/10. You can do this using an elevated Command Prompt, Taskkill shortcut, etc. You can also add a desktop context menu option for closing all the non-responsive processes for associated windows or applications at once using two to three mouse clicks. For that, you can check the steps covered in this post. Read: How to force close a Program which Task Manager cannot terminate
How do I create a Taskkill?
If you want to create a Taskkill shortcut for killing the non-responsive processes for programs/applications, then first open the shortcut wizard. After that, put the following path in the location of the item field: Give a name to the shortcut to complete the shortcut wizard and execute the shortcut you just created. Read next: Unable to terminate process, Access is denied, The operation could not be completed.

![]()
